2017 ~ Learning Instrumentation And Control Engineering Learning Instrumentation And Control Engineering

Control Valve Actuators Failure Modes

Custom Search

Control valves can be built from various combinations of valve actuator and valve body. The combination of actuator and valve body is usually chosen to provide a particular failure mode should the instrument air supply fail for any reason.
The most common control valve actuator used in the industry is the diaphragm actuator. Diaphragm actuators, as in the case of valve bodies, can be classified as either direct or reverse acting. 


Any failure mode can be obtained with a combination of direct or reverse acting
actuator and direct or reverse acting valve body. The two most common failure mode of control valves are :

1. Fail Open
2. Fail Close

These two failure modes can be achieved by an Air to Close Valve (ATC) and an Air to Open valve (ATO).

Air to Close Control Valve (ATC)
An air to close (ATC) valve and therefore fail open valve, can be obtained with the combination of a reverse acting actuator and a reverse acting valve body or a direct acting actuator and a direct acting valve body.

Air to Open Control Valve (ATO)
An air to open (ATO) valve and therefore fail close valve, can be obtained with a combination of direct actuator and reverse body or reverse actuator and direct Body.

Valve Body and Actuator Combination and Their Failure Modes
The action of an actuator can easily be determined (usually by whether the air is supplied to the upper or lower half of the housing). Direct or reverse acting valve bodies are not always readily identifiable. Most often, reference to the nameplate or flow sheet is usually necessary to correctly identify the action of a valve body – reverse acting or direct acting.

Listed in the table below are all possible combinations of valve body and actuator and their failure modes:

Valve Actuator 
Valve Body
Valve Action
Failure Mode
Direct 
Direct
Air to Close
Fail Open
Reverse
Reverse
Air to Close
Fail Open
Direct
Reverse
Air to Open
Fail Closed
Reverse
Direct
Air to Open
Fail Closed


Basics of Split-Range Control in Control Valve Applications

Custom Search

In many process control applications in industry, it is sometimes desirable to have multiple control valves respond to the output of a single common controller. Control valves configured in this way to follow the command of a single controller are said to be split-ranged, or sequenced.

Split-ranged control valves may assume different forms of sequencing. Common modes of control valve sequencing seen in the process industry are:  complementary, exclusive, and progressive.

Complementary Split-Range Control
With this form of split-ranging, there is never a condition in the controller’s output range where both valves are fully open or fully shut. Rather, each valve complements the other’s position.  A typical example of complementary split-range control is a situation where two valves serve to proportion a mixture of two fluid streams, such as where base and pigment liquids are mixed together to form colored paint as shown below:
Example of complementary split-range control.


Both base and pigment valves operate from the same controller output signal. While the pigment valve is Air-To-Open, the base valve is Air-To-Close. The following table shows the relationship between valve opening for each control valve and the controller’s output:
Controller Output (%)
I/P Output (PSI)
Pigment Valve (Stem position)
Base Valve (Stem position)
0
3
Fully Closed
Fully Open
25
6
25% Open
75% Open
50
9
Half-Open
Half - Open
75
12
75% Open
25% Open
100
15
Fully Open
Fully Closed

Exclusive Split-Range Control
The nature of valve sequencing in this type of split-range control is to have an “EITHER OR” throttled path for process fluid. That is, either process fluid flows through one valve or through the other, but never through both at the same time.

This type of split-ranged control valves call for a form of valve sequencing where both valves are fully closed at a 50% controller output signal, with one valve opening fully as the controller output drives toward 100% and the other valve opening fully as the controller output goes to 0%.

A practical example of this form of split-ranging is in reagent feed to a pH neutralization process, where the pH value of process liquid is brought closer to neutral by the addition of either acid or caustic:
Exclusive Split-Range Control

The basic operating principle of the above process is:
  1. A pH analyzer monitors the pH value of the mixture and a single pH controller commands two           reagent valves to open when needed.

  2. If the process pH begins to increase, the controller output signal increases as well (direct action)         to open up the acid valve.

  3. The addition of acid to the mixture will have the effect of lowering the mixture’s pH value.

  4. Conversely, if the process pH begins to decrease, the controller output signal will decrease as      well, closing the acid valve and opening the caustic valve.

  5. The addition of caustic to the mixture will have the effect of raising the mixture’s pH value.
The Air-To-Open acid valve has an operating range of 9 to 15 PSI, while the Air-To-Close caustic valve has an operating of 9 to 3 PSI. The table below shows the relationship between valve opening for each control valve and the controller’s output:

Controller Output (%)
I/P Output (PSI)
Acid Valve (Stem position)
Caustic Valve (Stem position)
0
3
Fully Closed
Fully Open
25
6
Fully Closed
Half - Open
50
9
Fully Closed
Fully Closed
75
12
Half - Open
Fully Closed
100
15
Fully Open
Fully Closed

Progressive Split-Range Control
This form of split-range control for control valves is used to expand the operating range of flow control for some fluid beyond that which a single control valve could deliver. In this type of control, one of the valve usually a small valve opens gradually and becomes fully open at 50% of controller output while the large valve will remain shut at until the controller output goes beyond 50% when it starts opening. Both valves become fully open when controller output is 100%.

An example of progressive split-range control is a pH control process where the incoming liquid always has a high pH value, and must be neutralized with acid as shown below:
An example of progressive split-range control

The PH of the incoming water to be treated is measured by the analyzer, AT. As the output of controller AIC increases, the small acid valve starts to open and becomes fully open at 50% of controller output. Meanwhile the large acid valve will remain shut until controller output goes beyond 50%. At 100%, both small and large acid valves are fully open to ensure that the PH of the incoming water is neutralized.

Controller output and valve status for proper sequencing of the small and large acid control valves is shown below:

Controller Output (%)
I/P Output (PSI)
Small Acid Valve (Stem position)
Large Acid Valve (Stem position)
0
3
Fully Closed
Fully Closed
25
6
Half Open
Fully Closed
50
9
Fully Open
Fully Closed
75
12
Fully Open
Half Open
100
15
Fully Open
Fully Open


How a Self Operated Pressure Reducing Regulator Works

Custom Search

A self operated pressure reducing regulator is a mechanical device that is used to control and reduce pressure especially in natural gas plants. A pressure regulator is essentially a force balanced device that adjusts to changes in the system it is controlling. There are two types of pressure reducing regulators used in natural gas systems:
1. Self operated regulators
2. Pilot operated regulators
Both types of regulators are very common in the gas industry the self-operated regulators are general used in lower flow and lower pressure system, and are less expensive regulators. While the pilot operated regulators are generally use in higher flow situation, like city gates, large customers, industrial accounts etc and where you have higher pressure to control.

Basic Parts of a Self Operated Pressure Reducing Regulators
Self Operated regulators consist of three basic components:
1. A loading element. 
2. A measuring element and 
3. A restrictive element as shown below

Self Operated Pressure Reducing Regulator

As seen above, the loading element is typically a spring but it can also be a weight or pressure from some external source. When the spring is compressed, it exerts a loading force. The measuring element or diaphragm is connected to the process fluid (gas) that is being controlled and creates a force opposing the loading force. The restricting element or valve is connected to the spring and diaphragm assembly and regulates the flow through the regulator.

Operating Principle of Self Operated Pressure Reducing Regulators
In a self operated pressure regulator, as downstream system pressure decreases the spring force overcomes the force of the gas acting on the effective area of the diaphragm and the valve opens increasing flow into the system. When system pressure increases, the measuring force (the force of the system gas acting on the effective area of the diaphragm) overcomes the loading force (spring force) and closes the valve reducing flow into the system.


What is Damping in Process Transmitters

Custom Search

A process transmitter typically ”measures” a process variable – flow, level, temperature, pressure - and produces an output in response to changes in the input variable. Most transmitters incorporates a sensor which measures the input variable and gives out an output of which 4 – 20m A is common.


Of critical importance in the performance of a transmitter is a concept called damping. As the input variable changes, the transmitter output must update and change accordingly. Damping is the amount of time required, in addition to the update time, for the output of the transmitter to reach 63.2% of its final value after a step change has been applied to the input. A typical damping response curve of a process transmitter is shown below:


Transmitter damping is adjustable from 1 to 32 seconds. Damping reduces the effects of electrical noise and any other insignificant transient noise that may influence the transmitter output signal. It is often used to stabilize control loops and prevent false trips. In the absence of electrical or transient noise, damping may not be required in processes that are slow and have inherent lag time e.g temperature control loops. Damping should be minimized in fast changing process conditions.


ANSI B16.5 - Maximum Pressure and Temperature Ratings of Flanges and Flange Fittings

Custom Search

The Maximum allowable non-shock pressure (psig) and temperature ratings for steel pipe flanges and flanged fittings according the American National Standard ANSI B16.5 are given in the table below. 

Flanges and their Fittings are a common feature in the process plants. The need to accurately determine their pressure rating and corresponding temperature ratings is important for personnel and plant safety and overall plant performance and reliability:


Maximum Allowable Non-Shock Pressure (Psig)
Temperature (°F)
Pressure Class (lb)
150
300
400
600
900
1500
2500
Hydrostatic Test Pressure (Psig)
450
1125
1500
2225
3350
5575
9275
-20 to 100
285
740
990
1480
2220
3705
6170
200
260
675
900
1350
2025
3375
5625
300
230
655
875
1315
1970
3280
5470
400
200
635
845
1270
1900
3170
5280
500
170
600
800
1200
1795
2995
4990
600
140
550
730
1095
1640
2735
4560
650
125
535
715
1075
1610
2685
4475
700
110
535
710
1065
1600
2665
4440
750
95
505
670
1010
1510
2520
4200
800
80
410
550
825
1235
2060
3430
850
65
270
355
535
805
1340
2230
900
50
170
230
345
515
860
1430
950
35
105
140
205
310
515
860
1000
20
50
70
105
155
260
430


Control Valve Selection Requirements

Custom Search

Control valves abound in every area of industrial process control. Control valves handle all kinds of fluids at temperatures from the cryogenic range to well over 1000°F (538°C). Selection of a control valve body assembly requires particular consideration to provide the best available combination of valve body style, material, and trim construction design for the intended service. Capacity requirements and system operating pressure ranges also must be considered in selecting a control valve to ensure satisfactory operation without undue initial expense.

Information required to select a control valve. Photo Credit : Fisher

The numbers in the orange colored circles in the above control valve diagram corresponds to the serial numbers in the table below where we have given the typical information required to select the right control valve. For example serial numbers 1, 2, 3, 4, 5 represents fluid properties corresponding to serial numbers 1, 2, 3, 4,5 in the table below.

To have a clear understanding of the information required to select a control valve which we have discussed in this article, please read the following:
Because of the tendency to get the selection of control valves wrong, most control valve manufacturers and their representatives have dedicated themselves to helping their clients select the control valve most appropriate for the existing service conditions. To aid in selecting the right control valve, the following information must be provided before the actual sizing and selection process:


S/N   
CONTROL VALVE SELECTION INFORMATION
1 Type of fluid to be controlled What fluid will you be controlling? Water?, natural gas? 
2 Temperature of fluid State the worst scenario temperature of the fluid in degree Fahrenheit or Celsius
3 Viscosity of fluid
4 Specific gravity of fluid
5 Flow capacity of the control valve State the maximum and minimum flow rates.
6 Inlet pressure at valve State maximum and minimum inlet pressures expected to be handled by the control valve
7 Outlet pressure at valve State maximum and minimum outlet pressures expected to be handled by the control valve
8 Pressure drop during normal flowing conditions
9 Pressure drop at shut off
10 Noise level State the maximum permissible noise level if required and the measurement reference point e.g 55 dBA
11 Degrees of superheat or existence of flashing if known
12 Inlet and outlet pipeline size and schedule
13 State whether any special tagging information is required for the control valve
14 Body material of the control valve State the required body material of the control valve - ASTM A216 grade WCC, ASTM A217 grade WC9, ASTM A351 CF8M, etc.)
15 End connections and valve ratings Is it going to be screwed? Class 600 RF flanged? Class 1500 RTJ flanges? etc
16 Valve action desired when instrument air fails Is the valve to fail open, close or retains its last controlled position?
17 Instrument Air Availability State whether the valve require instrument air
18 Valve type number Only when required by manufacturer
19 Valve size
20 Valve body construction Is the valve body going to be angle? double-port? Butterfly? etc.
21 Valve port size State whether the valve port size is going to be full or restricted
22 State the desired valve trim materials required
23 Flow action State whether flow will tend to open valve or close valve
24 Actuator size State the size of actuator required for the control valve.
25 Bonnet Style Is the bonnet style going to be plain, extension,
bellows seal, etc.

26 Valve packing materials State the type of valve packing material - PTFE V-ring, laminated graphite, environmental
sealing systems, etc.

27 Valve accessories State the control valve accessories required – positioner, handwheel etc


How to Calibrate a Fisher 3582 Pneumatic Valve Positioner

Custom Search


The valve positioner is a critical component in the control valve loop as it helps to accurately position the valve during the control process. However, failure to calibrate the positioner accurately could lead to wrong valve positioning which could in turn have significant impact on the process where the control valve is being used. Imagine supplying a customer natural gas at 5barg through a control valve controlled by a controller taking signal from the supply to the customer. If pressure suddenly goes to 7barg and the controller gives a signal to the control valve to close more to bring the pressure to 5barg, if the control valve is wrongly positioned and fails to close more, we could be giving the customer more than 5barg! This could be catastrophic and lead to undesirable consequences.

In view of the importance of a positioner in accurately positioning the control valve plug, the need to accurately calibrate the valve positioner cannot be over emphasized. The set up below illustrates the basic components required to calibrate a control valve positioner:


Before studying this procedure, read : How a Pneumatic Valve Positioner Works 

Procedure for Calibrating a Pneumatic Valve Positioner

Step 1
Shut off the supply pressure to the valve positioner. Connect or reconnect the necessary tubing from the valve positioner output to the actuator supply connection. Connect the input to the valve positioner and set the input signal value at mid-range.

Step 2
Move the flapper assembly to approximately position 6 in the proper operating quadrant of the beam (direct or reverse acting), and apply supply pressure to the valve positioner. The 0 degree index marks on the rotary shaft arm should align with the case index marks as shown in diagram below and the actuator should be at its mid-travel position. If not, first check for loose linkage or improper cam installation. A minor nozzle height adjustment might be necessary to make the desired input signal value correspond to the starting point of travel.
Positioner Beam and Arm Index Marks. Photo Credit: Fisher

Step 3
Apply an input signal equal to the low value of the input signal range. If your positioner is a 0.2bar – 1.2 bar range (3 to 15psig) input range, set the input to 3psig. Loosen the nozzle locknut and adjust the nozzle until the actuator moves to the proper end of its travel. Changing the nozzle position is intended only as a means of zero trim adjustment. Whenever nozzle position is changed, the zero reference point is changed. 

Step 4
Apply an input signal equal to the high value of the input signal range (15psig, if using a 3 to 15psig positioner) and observe the actuator stem travel. If the stem travel is short of its expected range, increase the travel by moving the flapper assembly to a higher number on the beam. If the desired stem travel occurs before the input signal reaches the high value of the input signal range, decrease the travel by moving the flapper assembly toward a lower number on the beam.

Step 5
Repeat steps 3 and 4 until the correct travel is achieved. Each time the flapper assembly position is changed in step 4, repeat step 3 to provide proper zero. Note that Moving the flapper assembly toward zero on the beam scale decreases stem travel.


How An Air Pressure Regulator Works

Custom Search

In pneumatic instrumentation systems, instrument air is required to power valve actuators and other instruments - transmitters, controllers, control valves etc. A key component of the instrument air supply system is an air pressure regulator. The air pressure regulator is a simple device.  It is used to lower the main instrument air supply of a plant to a pressure suitable for an air-operated instruments; eg, a transmitter, control valve, etc.  

Normally, each air operated instrument has its own regulator.  So an air regulator is one of the most common devices in the plant.  There are various manufacturers of air regulators, eg Masoneilan and Fisher.  However, they all work in much the same way.  The schematic of a Fisher air pressure regulator is shown below:


Principle of Operation of the Air Pressure Regulator
  1. The main air supply is connected to the AIR INLET PORT.  Air passes into  the filtering chamber at the bottom of the regulator.
  2. Air passes through the filter which removes dirt particles in the incoming air which may block nozzles etc.  It then goes into the valve assembly.
  3. The valve assembly is moved by the range spring pressing on the diaphragm.
  4. The range spring will hold the valve assembly down until the output pressure is high enough to lift the diaphragm (via the air passage shown).  At this point the small spring in the valve assembly closes the valve.
  5. Air is allowed to pass through a hole at the center of the diaphragm and out of the vent.  This maintains balanced pressure across the diaphragm.
  6. If the outlet pressure is above the pressure set by the range spring, the air will go out through the vent above the diaphragm.  When the outlet pressure is correct, the valve assembly opens to set the correct pressure. This pressure exits the regulator through the OUTLET AIR PORT
  7. If the outlet pressure is below the pressure set by the range spring the valve assembly will stay open until the set pressure is reached.


Process Performance of Correctly Sized, Undersized and Oversized Control Valves

Custom Search

In the process of sizing and selecting control valves, there is one of three possible outcomes:
1. The valve is correctly sized or 
2. The valve is oversized or
3. The valve is undersized

Characteristics of Correctly Sized, Under-sized and Over-sized Control Valves

A Correctly Sized Control Valve (The right valve Cv)
A correctly sized valve has the required capacity to deliver the right flow rate at minimum, normal and maximum flows and helps to safeguard optimal control both as far as comfort and economy are concerned.

Oversized Control Valves (Large Cv)
An oversized valve has poor controllability. An oversized control valve implies that all normal operations will be confined to small openings of the valve with great risk of variable sensitivity and aggravation of any uneven movement of the valve. Poor accuracy and unstable control often result.
The smallest change in stroke in an oversized valve will result in large flow variations. As the valve opens or closes, large flow speeds and a powerful turbulence are created between the plug and seat. This both erodes the valve and causes noise. 

Undersized Control Valves (Small Cv)
If the control valve is undersized (Cv - too small), the required flow rate will not be achieved even when the valve is fully opened. If a higher pressure is applied to force a higher flow rate across the undersized valve; not only the pump energy will be excessive but also the valve may cavitate or develop flashing.


How a Pneumatic Displacer level sensor is used to Control Liquid Level

Custom Search

Although we have covered the principle of operation of the displacer level sensor before, here we attempt to introduce you how a pneumatic displacer level sensor is applied in liquid level control in a process plant. The anatomy of a typical pneumatic displacer level sensor is exemplified by the fisher 25000 controller/displacer level sensor assembly:
Fisher 2500 Pneumatic Level Sensor. Photo Credit : Fisher

Principle of Operation of the Displacer Level Sensor/Controller 

Liquid Level Controller Using a Displacer Level Sensor

As shown above, changes in the level of liquid in the vessel whose level is being controlled exerts a buoyant force on a displacer which causes the rotation of a torque tube shaft. The rotation of the torque tube shaft is converted into a proportional pneumatic output signal by the pneumatic controller attached to the displacer level sensor. Typically, this pneumatic output is 3 – 15psig. The output signal from the controller drives a dump valve open to evacuate liquid from the vessel. When liquid level rises, the buoyant force on the displacer increases leading to increasing output from the controller if it is a direct acting controller. When the liquid level falls, the buoyant force on the displacer decreases resulting in decreasing output to the controller. If the controller is set at 25% of vessel level for example, then as soon as liquid in the vessel reaches 25%, the controller outputs a signal to completely open the dump control valve to release the liquid to a dump or safe area in the case of a hazardous liquid e.g hydrocarbon condensate.


How the Foxboro 43AP Pneumatic Controller Works

Custom Search

The Foxboro 43AP pneumatic controller is a versatile process instrument controller that can be used to control pressure, temperature , flow and level. As with all process controllers, the Foxboro 43AP pneumatic controller continuously detects the difference between a process measurement and its set point, and produces an output air signal that is a function of this difference and the type of control. 
Controller Loop for a Pneumatic Controller
The output signal is transmitted to a control valve or other control device. The process measurement, set point, and output signal are indicated on the controller.

Foxboro Pneumatic Controller with Proportional, Reset and Derivative Actions and Automatic Manual Transfer System. Photo Credit: Foxboro
Principe of Operation of the 43AP Pneumatic Controller
The above schematic shows the basic internal parts of the mechanism of operation of a Foxboro 43AP pneumatic controller. The principle of operation of the device is explained below:

  1. A differential linkage measures difference between measurement pointer and setting index         positions as shown in the schematic above. This error signal moves proportioning lever.
  2. The proportioning lever pivots at its center on the end of a flat spring.
  3. This motion of the proportioning lever changes flapper nozzle relationship, causing relay to        establish an output pressure.
  4. This output pressure is fed back to the proportioning bellows, which acts through the                  proportioning lever to re-balance flapper nozzle.
As shown above, this particular controller model has reset bellows as well as a derivative tank. The reset bellows and tank assembly are used when measurement must be maintained exactly at control point -that is without “offset”. The derivative tank assembly is used to improve system response to a slow process.


Pressure Drop Regimes Across a Control Valve

Custom Search

Control valves are critical elements in industrial process control. They are used for controlling various types of fluid. However as fluid passes across a control valve, the pressure regimes across the valve especially pressure drop changes with flow. A basic understanding of the pressure regimes across a control valve will help in the valve sizing process.

To accurately size a control valve, we must correctly predict the pressure drop across the valve from minimum flow to normal to maximum flow.

Typically as flow increases across a valve, the pressure drop across the valve reduces until it gets to the minimum allowable pressure drop across the valve at maximum fluid flow. As flow decreases, the pressure drop across the valve increases commensurately. These variations are illustrated in the diagram below:


As shown in the diagram above:
1. As flow increases across the valve , upstream pressure P1 drops
2. The pressure drop across the valve, ∆P, decreases as flow increases
3. At zero flow, ∆P is maximum and the downstream pressure P2 = 0
4. As flow increases, downstream pressure, P2 increases.
5. At maximum flow across the valve, ∆P is minimum


How to Select the Adjustable Range of a Pressure Switch

Custom Search

The adjustable range of a pressure switch is also known as the working range of the switch. It is the pressure range a switch may see under normal working conditions.

In the process of adjusting a pressure switch, accuracy and the service life could be compromised. Efforts should therefore be made when adjusting a pressure switch to ensure that the desired accuracy can be achieved while at the same time ensuring that the switch lasts long by choosing the right adjustable or working range of the pressure switch.

For the greatest accuracy, the set point of the pressure switch should be adjusted such that the set point fall in the upper 65% of the adjustable range. For a long service life, the switch set point should be adjusted to fall in the lower 65% of the adjustable range. 

Adjustable Range of a Pressure Switch


The best combination of accuracy and long service life lies in the middle 30% of the adjustable range as shown above. This rule applies to diaphragm as well as bourdon tube pressure switches.

As shown in the schematic diagram above depicting the various operating zones of the pressure switch, we can see that :

1. For optimum accuracy and long service life, select Zone A

2. For long service life, select Zone C

3. For accuracy, select Zone B


Operating Principle of Variable Area Flow Meters

Custom Search

The variable area flowmeter is a reverse differential pressure meter used to accurately measure the flow rate of liquids and gases. The flow meter generally comprises a vertical, tapered glass tube and a weighted float whose diameter is approximately the same as the tube base.

How the Variable Area Flow Meter Works
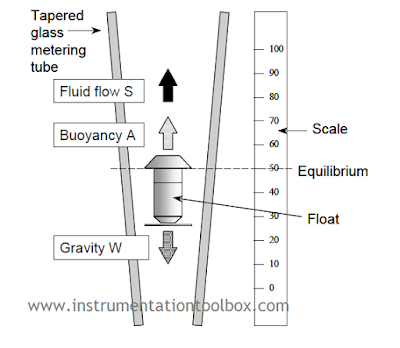
The schematic below shows the basic design of a variable area flow meter:
Basic Design of a Variable Area Flow Meter : Photo Credit Brooks Instrument
During operation, the fluid or gas flows through the inverted conical tube from the bottom to the top, carrying the float upwards as indicated by the arrow in our schematic above. Since the diameter of the tube increases in the upward direction, the float rises to a point where the upward force on the float created by differential pressure across the annular gap, between the float and the tube, equals the weight of the float.

As shown in the schematic above, three forces are seen acting on the float:

(a) A constant gravitational force, W.

(b) A buoyancy force, A, which is constant if the fluid density is constant (According to Archimedes principle)

(c) Flow resistance force S, the upward force of the fluid flowing past the float.

Two of these forces are acting in an upward direction as indicated by the arrows in the schematic above. They are the buoyancy force A and the flow resistance force S. The gravitational force W, acts downward.

When the float is stationary, W and A are constant and S must also be constant. In a position of equilibrium (floating state) the sum of forces S + A is opposite and equal to W and the float position corresponds to a flow rate that can be read off a scale. 

A major advantage of the variable area flowmeter is that the flow rate is directly proportional to the orifice area that, in turn, can be made to be linearly proportional to the vertical displacement of the float. Thus, unlike most differential pressure systems, it is unnecessary to carry out square root extraction.

Flow Rate Equation for the Variable Area Flow Meter
In a typical variable area flow meter, the flow Q can be shown to be approximately given by:
                 
$Q = CA\sqrt{ρ}$

where:
Q = flow
C = constant that depends mainly on the float
A = cross-sectional area available for fluid flow past the float
ρ = density of the fluid
As shown by the flow equation above, indicated flow depends on the density of the fluid which, in the case of gases, varies strongly with the temperature, pressure and composition of the gas.

Floats Used in Variable Area Flow Meters
A wide variety of float shapes are available for use in variable area flow meters. The weight, shape and materials of these floats are adapted to the individual installations. The common floats used are:
A. Ball float
B. Viscosity-immune float
C. Viscosity-dependent float
D. Float for low pressure drop


Different Shapes of Floats used for Variable Area Flow Meters. Photo Credit: ABB Flow

The ball float (A) is mainly used as a metering element for small flowmeters. The viscosity-immune float (B) is used in applications where viscosity change is a critical factor. The viscosity-dependent (C) float is used in larger sized variable area flowmeters. Floats for low pressure drop (D) applications are very light in weight with relatively low pressure drops. Its design requires minimum upstream pressures and is usually preferred for gas flow measurement.

Flow Metering Tubes
The meter tube of a variable area meter is normally manufactured from borosilicate glass that is suitable for metering process medium temperatures up to 200 °C and pressures up to about 2 - 3 MPa. Because the glass tube is vulnerable to damage from thermal shocks and pressure hammering, it is often necessary to provide a protective shield around the tube.

Variable area meters are inherently self-cleaning since the fluid flow between the tube wall and the float provides a scouring action that discourages the build-up of foreign matter. Nonetheless, if the fluid is dirty, the tube can become coated – affecting calibration and preventing the scale from being read. This effect can be minimised through the use of an inline filter.

The temperature and pressure range may be considerably extended (for example up to 400 °C and 70 MPa) through the use of a stainless steel metering tube. Again, the float can incorporate a built-in permanent magnet that is coupled to an external field sensor that provides a flow reading on a meter.

Floats Centering Methods in Variable Area Meters
An important requirement for accurate metering is that the float is exactly centered in the metering tube. One of three methods is usually used:

(a) Slots in the float head cause the float to rotate and center itself and prevent it sticking to the walls of the tube. Slots cannot be applied to all float shapes and, further, can cause the indicated flow to become slightly viscosity dependent.


(b) Three molded ribs within the metering tube cone, parallel to the tube axis, guide the float and keep it centered. This principle allows a variety of float shapes to be used and the metering edge remains visible even when metering opaque fluids.


(c) A fixed center guide rod within the metering tube is used to guide the float and keep it centered. The use of guide rods is confined mainly to applications where the fluid stream is subject to pulsations likely to cause the float to ‘chatter’ and possibly, in extreme cases, break the tube. It is also used extensively in metal metering tubes.

Floats Centering Methods in Variable Area Flow Meter Design

Materials Used in Construction of Floats
The float material is largely determined by the medium and the flow range and includes: stainless steel, titanium, aluminium, black glass, synthetic sapphire, polypropylene, Teflon, PVC, hard rubber, Monel, nickel and Hastelloy C.

Advantages of Using a Variable Area Flow Meter
1. It has wide range of applications.
2. It has a linear float response to flow rate change.
3. It has a 10 to 1 flow range or tum-down rate.
4. Easy sizing or conversion from one particular service to another.
5. Ease of installation and maintenance.
6. Simplicity and low cost.
7. High low-flow accuracy (down to 5 cm3/ min). 
8. Easy visualisation of flow

Disadvantages of Using a Variable Area Flow Meter
1. It has limited accuracy.
2. It is susceptibility to changes in temperature, density and viscosity.
3. Fluid medium must be clean, no solids content.
4. Erosion of device (wear and tear).
5. It can be expensive for large diameters application.
6. It operates in vertical position only.
7. It requires accessories for data transmission.


How a Coriolis Mass Flow Meter Works

Custom Search

The vast majority of flow meters in use today are volumetric. However, there are a few other applications where what is required is a mass flow meter. One of such mass flow meters is the Coriolis Mass Flowmeter that can measure both the mass of liquids and gases.

Today, commercial Coriolis flowmeters are gradually gaining prominence in flow measurement applications. Steady technical improvements on these meters since they first came into the markets in the 1970s have greatly increased their accuracy and acceptance in the process industries. Currently in the process industries, direct mass flow measurements represent a substantial and fast-growing percentage of worldwide flowmeter applications (15 to 20%). The diagram below shows the construction a U-shaped Coriolis mass flow meter:
Construction a Commercial Coriolis Mass Flow Meter. Photo Credit: Micro Motion


How a Coriolis Mass Flow Meter Works
A Coriolis flowmeter requires a force acting on a tube carrying a flowing fluid. This force deforms tubes through which the fluid flows. The amount of deformation depends directly on the mass flow rate through the tubes. Signals from sensors measuring this deformation provide a direct indication of the mass flowrate.
In a Coriolis meter measuring process mass flow rates, the flowmeter must rotate the fluid. In practice they rotationally oscillate the fluid, which produces equivalent Coriolis forces. Tube designs are U-shaped, S-shaped, or straight. 

Design and Working Principle of a Commercial Coriolis Meter
Inside U-shaped sensor housing, the U-shaped flow tube is vibrated at its natural frequency by a magnetic device located at the bend of the tube. The vibration is like that of a tuning fork, covering less than 0.1 in. and completing a full cycle about 80 times/sec. As the liquid flows through the tube, it is forced to take on the vertical movement of the tube as shown in the diagram below. When the tube is moving upward during half of its cycle, the liquid flowing into the meter resists being forced up by pushing down on the tube.
Operating Principle of the Coriolis Mass Flow Meter. Photo Credit : Micro Motion

Having been forced upward, the liquid flowing out of the meter resists having its vertical motion decreased by pushing up on the tube. This action causes the tube to twist. When the tube is moving downward during the second half of its vibration cycle, it twists in the opposite direction.

Having been forced upward, the liquid flowing out of the meter resists having its vertical motion decreased by pushing up on the tube. This action causes the tube to twist. When the tube is moving downward during the second half of its vibration cycle, it twists in the opposite direction. The amount of twist is directly proportional to the mass flow rate of the liquid flowing through the tube. Magnetic sensors located on each side of the flow tube measure the tube velocities, which change as the tube twists. The sensors feed this information to the electronics unit, where it is processed and converted to a voltage proportional to mass flow rate. The meter has a wide range of applications from adhesives and coatings to liquid nitrogen.

Commercial Coriolis flowmeters design incorporate identical dual tubes oscillating in opposite directions. The flow from process piping splits in two as it enters the flow meter. This provides a more balanced design, making the meter more resistant to external vibrations and temperature swings. Sensors mounted on the tubes measure their relation to each other rather than to a fixed plane.

Straight tube designs operate in a similar manner. The vibrating tube is fixed at its ends, creating two rotating reference frames. The rotations at the inlet and outlet sides are in opposite directions, creating opposing Coriolis forces that distort the tube.

Merits of Using a Coriolis Mass Flow meter

1. Used for direct, in-line and accurate mass flow measurement of both liquids and gases.

2. Can achieve accuracies as high as 0.1% for liquids and 0.5% for gases.

3. Mass flow measurement ranges cover from less than 5 g/m to more than 350 tons/hr.

4. Flow measurement is independent of temperature, pressure, viscosity, conductivity and density           of the medium.

5. Can be used for direct, in-line and accurate density measurement of both liquids and gases.

6. Multi-variable capability as mass flow, density and temperature can be accessed from the one             sensor.

7. Can be used for almost any application irrespective of the density of the process.

Demerits of Using a Coriolis Mass Flow Meter

1. They are very expensive.

2. Many models are affected by vibration.

3. Current technology limits the upper pipeline diameter to 150 mm (6 inches).

4. Secondary containment can be an area of concern.


How to Become a Highly Skilled Instrument Engineer and Instrument Technician

Custom Search

We have already seen the knowledge areas you require to become a successful instrument engineer and technician. However, the process of acquiring the skills that will make you a competent instrument engineer and technician requires a lot of hard work on your part. There are not shortcuts. On the road to becoming a highly skilled instrument engineer and technician, you must possess certain habits and or skills some of which are listed below:

Know Your Plant/Process
Knowing the process is one of the most important habit for highly skilled instrument engineers and technicians. To be effective in your job, you must have a thorough understanding of the process and how the various instruments in the plant/process interact to produce the desired outcome. One starting point in knowing your plant is learning how to read P&IDs and Process Flow Diagrams (PFDs).

Develop Competence in Using Available Engineering Tools
Every instrument engineer and technician is required to be able to use available engineering tools to interrogate the process to get all kinds of results to diagnose problems with the instrumentation installation. Tools like meters, calibrators and other necessary troubleshooting instruments should be leveraged upon by a good instrument engineer and technician to solve problems that occur in instrumentation installations.

Have a Mentor
Nobody will likely succeed in any endeavour without a mentor. Mentors are key building blocks in acquiring necessary engineering skills in the field of instrumentation. Mentorship will help to sharpen the skills of engineers and technicians and possibly shape their careers. Every instrument engineer and technician aspiring to become highly skilled and successful needs a mentor. Many companies run different kinds of mentorship programme to help to instil the necessary skills in their instrument engineers and technicians.

Engage in Continuous Learning
Learning in engineering is a continuous process. Continuous learning and training will help to horn your skills as an instrument engineer and technician. In a world that has been redefined by the advent of the internet, training in anything has been made easy because of the multiplicity of materials everywhere. In fact today, you have a huge number of training resources available. You can take training courses in your plant, at a training center, or over the web. You can quickly find instrumentation books and articles on the web just be doing a google search! 

One other quick way to learning is curiosity. You must have a natural curiosity to be able to learn new things and ask questions especially when you don’t know. There will always be someone, somewhere in your plant or company ready to share knowledge.

Share Your Knowledge
In the field of instrumentation and control, knowledge is king. A thorough knowledge of your process/plant will make you solve many problems in instrumentation and control. However, sharing your knowledge with others can help to make you and them more effective in your given tasks. It is therefore imperative that you strive to share whatever knowledge you have gained with colleagues and co-workers.


You May Also Like: