
Custom Search
Instrument loop diagrams are also called instrument loop drawings or loop sheets. These set of drawings are more detailed than process and instrument diagrams (P&IDs). Loop diagrams are the most detailed form of diagrams for a control system and thus it must contain all details omitted by PFDs and P&IDs alike. Loop drawings can be customized per customer taste although certain minimum standard information is required to be included in loop sheets. However, the more detail you put into a loop diagram, the easier it makes the inevitable job of maintaining that system at some later date.
Typical information you would see on an instrument loop diagram or sheet are:
- They show all the instruments in a control loop
- Each instrument bubble in a loop diagram represent an individual device with its own terminals for connecting wires.
- Dashed lines in instrument drawings represent individual copper wires rather than whole cables
- Terminal blocks where wires connect are represented by squares with numbers in them.
- Cable numbers, wire colours, junction block numbers, panel identification, and grounding points are all shown in loop diagrams.
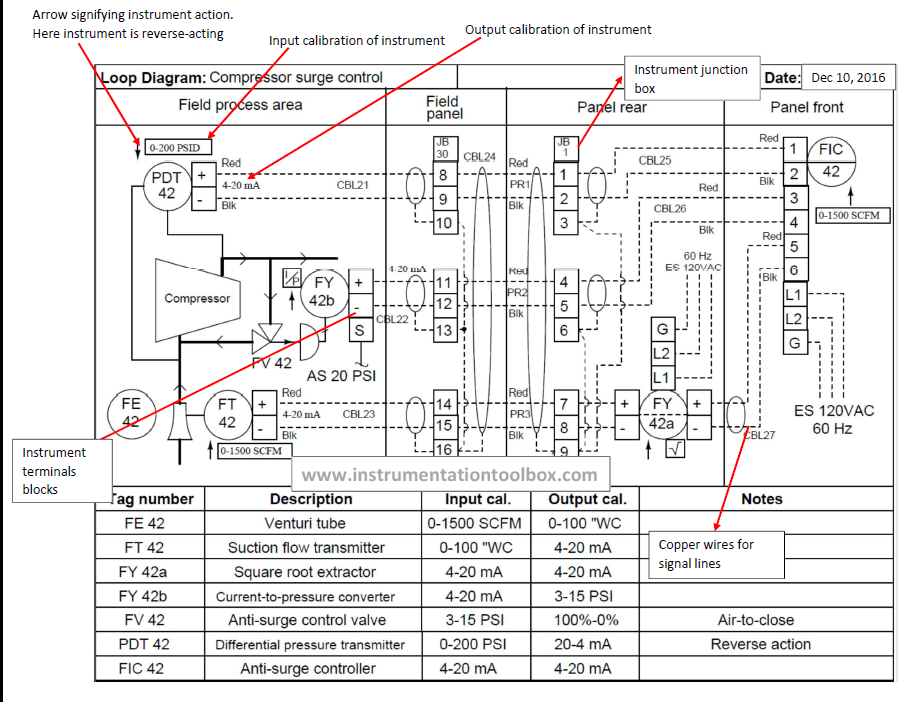
- Every instrument in a loop drawing has an input calibration and an output calibration specified for the instrument. For example in our loop drawing below, PDT (Pressure Differential Transmitter)-42 has an input calibration of 0 -200 PSID and gives out a 4 – 20mA as output. This 4 – 20mA is the output calibration.
- Loop drawings specifies the action of an instrument. That is whether the instrument is reverse- acting or direct-acting. An arrow pointing up or down close to the instrument is used to denote either of direct-acting or reverse-acting. An up arrow represents a direct-acting instrument- one whose output signal increases as the input stimulus increases. A down arrow close to the instrument represents a reverse-acting instrument- one whose output signal decreases as the input stimulus increases.
Shown below is a typical instrument loop or sheet diagram. We have used red arrows to show some common features. Study the drawing and see how many much more detail you could have on an instrument loop drawing:
 |
| Typical Instrument Loop Drawing |